

I was wasting away on Facebook yesterday when this lovely video popped up in my feed:
Mmmm… fluffy, lightly sweetened, bouncy souffle pancakes. Some people commented that they had tried them before in Taiwan and Japan and said it was like eating a cloud, and that it was airy like cotton candy. The stuff of daydreams.

I watched all the way through wondering how well the inside got cooked and how fluffy it would taste in my mouth. So I went searching for recipes and videos online. I couldn’t seem to find the right kind of recipe when I searched “Taiwanese Fluffy Pancake,” but there was a lot out there for “Japanese Fluffy Pancake” and before I knew it, I landed on the familiar pages of Nami’s blog at Just One Cookbook and was quickly convinced that her recipe held the key to a perfect fluffy pancake experience in my future. It looked very similar to the fluffy ones in this video- maybe with a little less bounce, but just as tantalizing.
On a side note, my husband’s favorite cuisine is Japanese, and her blog has been my favorite resource for Japanese eats and I am never disappointed when I attempt one of her delicious recipes. I’ve made her chasu, ramen, pressure cooker pork belly (kakuni) (DROOL Ben just requested this again yesterday, actually), and a bunch of other recipes I can’t remember. Check it out! So delicious.
Soon after I skimmed through the recipe, my brain told me, Hey, tomorrow’s Memorial Day, I should have time to make these… so I did! They were so delicious. Cutting into it felt like cutting into a souffle… pancake. Which makes sense. You could hear the soft “fizz” like when I cut my spoon through a souffle, because that’s basically what this is. Golden brown on the top, golden around the sides, light and airy, fluffy, moist, soft, lightly sweetened, and just beautiful to behold. My daughter ate more than her share of them so I’m really glad I doubled the recipe. I also felt like I learned a few cooking tricks as I watched her video, like how to pile on dollops over time to get more height in your pancake and how to use drops of water to steam a cake in a covered pan.

This step ensures even baking throughout despite using low heat. Just a few drops in empty spaces, cover with a lid, and it cooks right up!

I’ll include detailed instructions below, but making the batter for these light and airy souffle pancakes is a lot like making souffle batter. First, you separate the eggs, and mix the egg yolks together with most of the other ingredients.
In a separate bowl, whip up the egg whites like you would for a meringue. They key here is to whip until there are stiff, glossy peaks. You’ll know it’s ready when you can pull the beater out of the egg whites and there is a peak that only barely droops down.

The whipped egg whites are added to the rest of the mixture in three batches. First, you mix in a third of the egg whites just to lighten up the egg yolk mixture so that it will fold in more smoothly with the rest of the egg whites. When you add the second third, it’s important to stir less and fold more, a technique that requires you to scrape along the bowl more, use a light hand and not over-mix. By the time you add the last third, you should fold gently and slowly so you don’t break the air bubbles you mixed into the egg whites earlier. This will ensure the fluffiest souffle pancakes in the end!

One new and unusual technique I learned is to stack scoops of batter to make a taller pancake. This is an overview of the cooking method, which is expanded on in step 6:

It’s not super simple and it’s not super quick, but it is super delicious!

The recipe below is based on Nami’s with two changes: First, I doubled it. If I’m gonna go through the trouble of whipping up egg whites, I’m gonna get more than three pancakes out of it! This also doubles the cook time (which is already admittedly long for pancakes), so make sure you give yourself plenty of time. I had to feed my hungry family sausages and cereal while they waited for the pancakes to finish cooking!
The second change is that instead of cake flour, I subbed in all-purpose flour and cornstarch because I’m guessing most people (like me) don’t keep cake flour in the pantry. According to Kelli at www.thekitchn.com, cake flour is simply finely milled, delicate flour with low protein content which results in a fine crumb and a good rise. To make your own cake flour substitute, you can simply replace some flour with cornstarch or arrowroot powder. I used cornstarch to get my 1/2 cup of cake flour:
1/2 cup AP flour – 1 Tablespoons AP flour + 1 Tablespoons cornstarch = 1/2 cup cake flour
It worked out wonderfully. I snapped a couple photos even as the inevitable “fallen souffle” effect began to take place and then gobbled them up while they were still pretty fluffy.

A couple friends have already asked for the recipe, and I know I’m gonna need this in my life again in the near future, which reminded me that I have a BLOG to record and share such important life events! I think about my blog all the time, but the new GDPR/privacy policy stuff had me all stressed for a while and then we went to Disneyland and it was our FIRST FAMILY TRIP EVER and what little nighttime/computer energy I have these days went into planning and making sure that trip went smoothly and then suddenly it’s almost June and where has all the time gone?!
Anyway I’m back :D. With a yummy recipe to share here, and some posts I’m really excited to get up soon! It feels good to be back- please leave a little hello note! I’d love to hear from you guys, too!
Fluffy Japanese Souffle pancakes
Adapted from Just One Cookbook
Makes 6
Ingredients
- 4 large eggs
- 3 Tbsp whole milk
- 1/2 tsp vanilla extract
- 1/2 cup all purpose flour, with 1 tablespoon removed
- 1 tablespoon cornstarch
- 1 tsp baking powder
- 4 Tbsp granulated sugar
- 1 Tbsp neutral flavor oil (vegetable, canola, etc.)
- 2-4 Tbsp water (for steaming)
Optional
- Fresh whipped cream
- Fresh berries
- Powdered sugar, for dusting
- Maple syrup
Instructions
- Separate egg whites and egg yolks into two different bowls. The egg whites should go into the bowl you plan to whip them up in, such as your big Kitchenaid mixing bowl if you are planning to whip them up in your stand mixer. Put the bowl with the egg whites in the freezer for 15 minutes. (Interesting read on why you freeze them,and also why we don’t need cream of tartar).
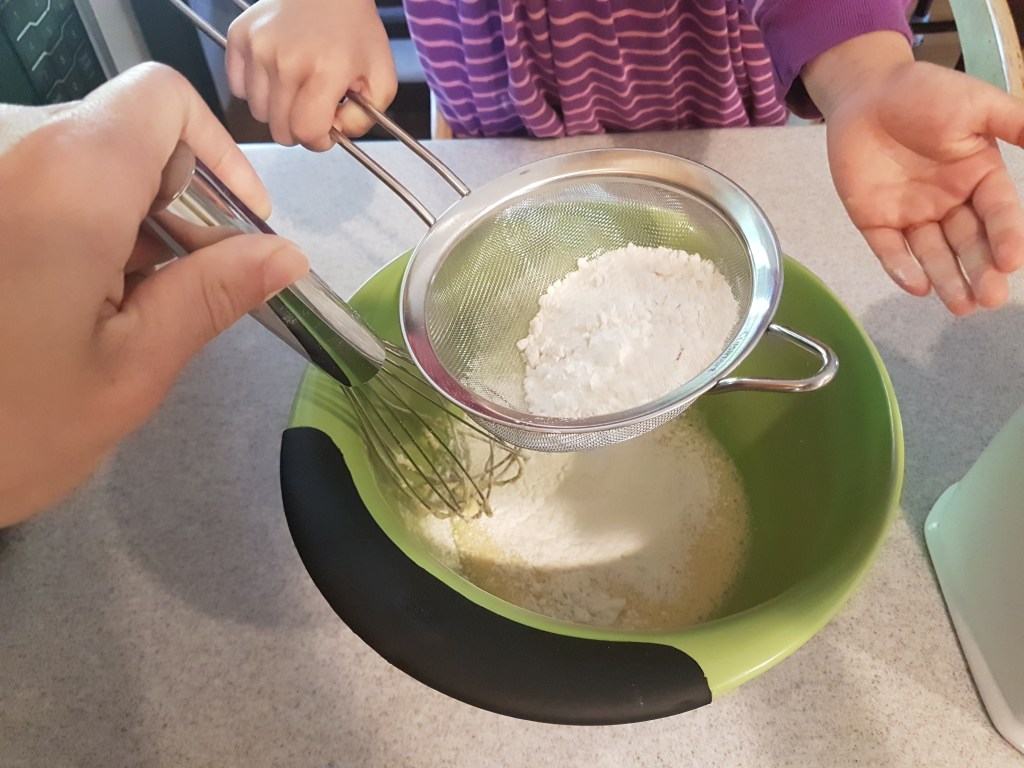
- Make egg yolk mixture: Add milk and vanilla to the egg yolks and whisk until thick and frothy. Sift the flour, cornstarch, and baking powder into the egg yolk mixture. Whisk to combine thoroughly (but do not over-mix). Set aside.
- Beat egg whites: After 15 minutes, take out the bowl with egg whites from the freezer. The egg whites should be half frozen. Now start beating the egg whites on high speed using an electric mixer. When the egg whites turn frothy and pale white, gradually add in sugar (roughly 1/3 at a time). Continue to whip the egg whites. They will become glossier and firmer. Stop beating when you lift the whisk attachment and the egg whites stand right up with stiff peaks slightly bending over.
- Prepare the frying pan: Heat the large non-stick frying pan to 300°F (I set my stove to almost the lowest possible setting). Brush pan with cooking oil and use a paper towel to remove any visible oil (otherwise the pancakes will have a spotty pattern). Keep the heat on while you combine the egg whites and egg yolk mixture.
- Combine the egg yolk and egg whites: Take 1/3 of egg whites and add into the egg yolk mixture to lighten it. Whisk together, then add half of the remaining egg whites to the egg yolk mixture. Use a balloon whisk to gently and slowly fold it in without breaking the air bubbles in the egg whites. Finally, transfer the egg yolk mixture into the remaining egg whites, carefully and thoroughly folding the two mixtures together without breaking the air bubbles. (Interesting read on why to use a whisk instead of a silicone spatula for folding). Set aside half of the batter in a bowl (for second batch of pancakes) and proceed to step 6 to cook your first batch of pancakes.
- Cook the pancakes: Plan to make three pancakes at a time. You will eventually stack up four scoops of batter to make each pancake, so expect to divide and ladle out about 12 portions of batter to make your first set of three pancakes. Here are the steps:
- First, use a small ladle (or oversized spoon) to place a scoop of batter onto the frying pan, then stack one more scoop on top. Then move on to the next two pancakes, giving each of them two small scoops.
- By the time all three pancakes have two scoops, the surface of the batter is slightly dry already, so you can stack one more scoop on top, keeping it up high. In the bowl, you should still have roughly three scoops left in your bowl (if you have slightly more, that’s okay). Dribble in about 1 tablespoon of water in three empty spaces inside the pan and cover with a domed lid. The water will keep the pancake moist.
- After 2 minutes have passed, open the lid and add one more scoop for each pancake (or more, until you have finished your batter). Make sure to stack high, not wide. If the water has evaporated, add a little bit more. Cover with a lid and cook.
- After 6-7 minutes have passed (it took me closer to 10 minutes), use an offset spatula to lift the pancake VERY GENTLY. If you feel the pancake is stuck, don’t touch until they firm up a little. If you force it, the pancake will crack in the middle (as pictured above haha). When the pancake is ready, you can easily move the pancake. Slightly pull the pancake to create an empty space and gently flip over with a rolling over motion.
- Add water in the empty spaces and cook for another 4-5 minutes, or until the bottoms have turned golden brown.
- Transfer to a plate and serve immediately. Repeat the cooking steps for the second half of batter.
They’re great by themselves, and also wonderful with freshly whipped cream and berries, or powdered sugar, or syrup. Enjoy!
Fun fact: When writing this recipe, I realized I totally forgot the baking powder when I made it today, so next time will only get better!
7 responses to “Fluffy Japanese Souffle Pancake (and Taiwanese Souffle Pancake) Recipe”
Meet JoEllen

JoEllen,
I love your blog and your recipes do not disappoint. I was so tempted when I saw these I had to try them. They are delicious. Thank you. I even took a photo because they turned out fluffy and fairly tall, I was impressed with myself!
PS: your scone, cauliflower soup, strawberry ice cream, and your dad’s lemon chicken recipes are all staples in our house.
AW THANKS STEPHANIE!!! THAT MAKES ME SUPER HAPPY!!! Isn’t it great when things actually turn out the way they do in your “inspiration photo”? I’d love to see your photo 😀 (If you can’t upload here, I have a FB page “Cuppacocoa” you could maybe share it on?). You also don’t know how delighted I am to hear that you’ve tried other recipes and that they are STAPLES IN YOUR HOUSE. Oh man, I LOVE THAT.
Speaking of cauliflower soup, I actually had an extra chunk of Gouda cheese on hand this week so I tried subbing it in for the white cheddar in the cauliflower soup. The texture was off (it was kind of gritty) but WOW flavor explosion in my mouth! I also accidentally added the cheese before blending it (instead of after), so maybe I will try again adding it after like I was supposed to to see if that makes a difference. Thank you for your super encouraging comment, I feel like it is helping re-energize me to blog more :D.
OMG,I really need to try this 🙂
It’s a bit of work for pancakes, but it’s yummy! Hope you enjoy!
I’m anxious to try this, but your recipe doesn’t say how much flour to use. It says “1/2 all purpose flour, with 1 tablespoon removed”
Is that 1/2 cup? I’m not sure.
Oops sorry! Yes 1/2 cup. Thanks for the heads up!
I like ur diagram and explanations. I have been making pancakes for the past two days and seeing which recipes work well, I’m trying ur method of stacking tonight! Thanks